How We Got Over the Air (OTA) HDTV in a Fringe Reception Area
(remote rural and/or mountainous terrain)
ONE MINUTE SITE TOUR
BACK to Cord-Cutting for the Rest of Us...
Us, we weren't so lucky in the antenna department. We needed to mount an antenna about as high as we dared out of doors, plus use a pre-amplifier on it. And besides that, get separate UHF and VHF antennas too, for the best possible signal reception of both types, and to keep the antenna wind profile as small as possible to hopefully survive frequent windstorms in the area. Since signals passing through a roof can lose half their strength, and our signal was likely going to be weak anyway due to our location, we wouldn't have installed our antenna in our attic, even if we could have gotten the components up there for assembly (the access door's pretty small).
We already possessed a huge amount of watchable TV and films via several Rokus in the house. But decided to add access to the major TV networks and local news too, via free over the air HD TV, if possible.
Mapping out the possibilities
I did plenty of research, utilizing tvfool.com to map out the challenges and possibilities, as well as referencing numerous other sites and sources. Here was the analysis tvfool.com gave for us:
http://www.tvfool.com/?option=com_wrapper&Itemid=29&q=id%3df1f0b120218134
Fortunately all the primary channels we were after were located on nearly the same line in direction from us, so no rotation would be required (putting a rotator motor on your antenna can add tremendously to the cost and complexity). But still, it would be a relatively expensive project, with great uncertainty in regards to the outcome (and many sources online say most retailers won't accept returns of outdoor TV antennas which have undergone the installation process).
3-24-15 UPDATE: Note that TVFool does NOT necessarily show you all the channels you might get with your antenna, because it often doesn't list subordinate channels broadcast from the same tower as a major channel. I didn't really take notice of this in my own project, until it came to my attention helping a friend 1000 miles away with their antenna. One example from my own case is the local channel 10 (or 10-1), which belongs to a major broadcast network, and is listed by TVFool. The same tower which broadcasts 10-1 also broadcasts 10-2 and 10-3. Granted, 10-2 and 10-3 only show old TV shows which are decades old, but we here tend to watch 10-2 about as much as we do 10-1! And TVFool does NOT list 10-2 and 10-3! Something similar happened with my friend far away, with her getting more than double the channels TVFool led us to expect, because TVFool didn't list the subordinate channels.
END UPDATE.
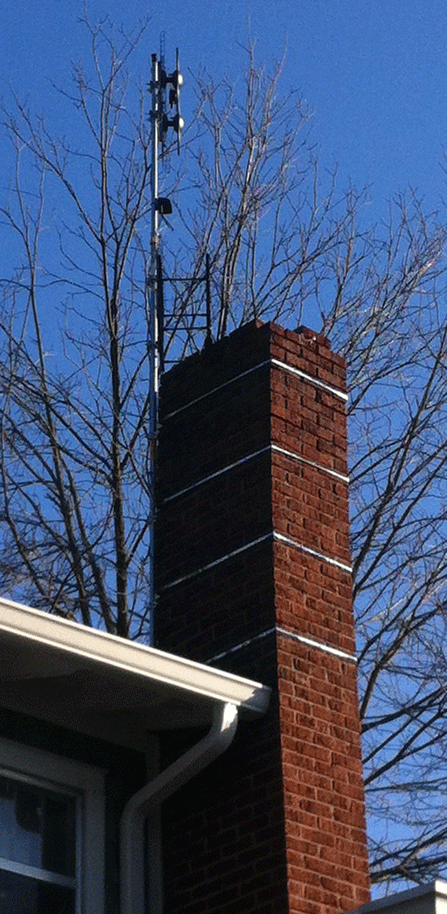
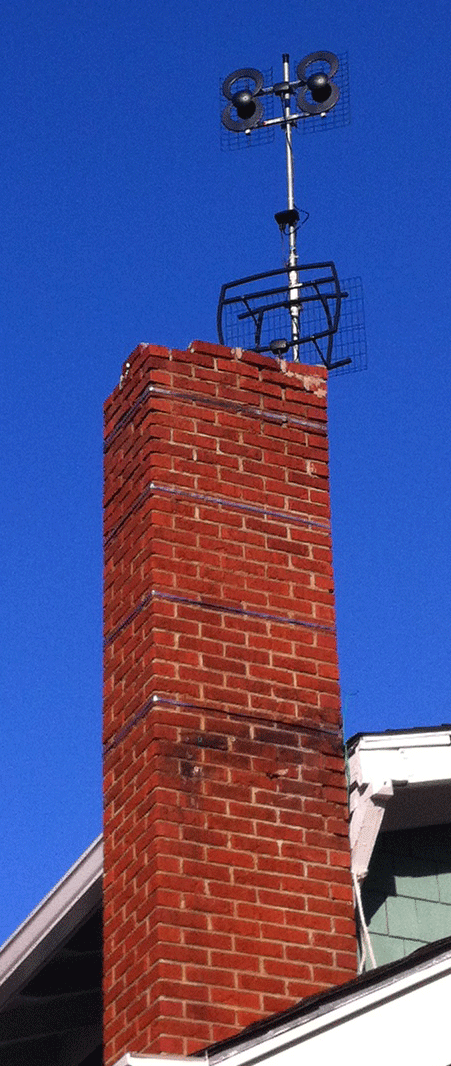
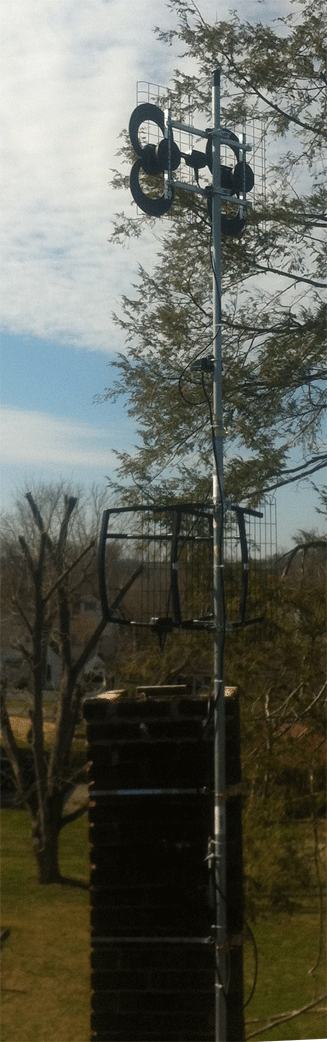
I finally settled on mounting the antenna mast on a roof top chimney, and using separate UHF and VHF antennas, along with a mast-mounted pre-amplifier.
There's an old TV antenna installation manual online which offers plenty of good info about antenna installation in general-- although some of the information is outdated, and so may confuse some with its talk about twin lead cable and such (something which likely isn't used for TV signals in much of the USA anymore). However, there's still plenty of relevant info in the manual. Especially for do it yourselfers.
Of course, being for professional installers, the manual assumes the reader to have some items most of us won't, like a signal tester by which to determine the best placement for an antenna on your roof or land.
I had no such tester. The manual read like a tiny portable TV might suffice for this in place of a more expensive professional's instrument, but I figured that was one of the outdated portions of the guide, written before digital signals were even being considered for a replacement to analog (e.g., using an old analog portable TV likely wouldn't help you determine modern digital channel strength; and our project budget was already too stretched to add the purchase of a new digital portable TV to it for this purpose).
So I didn't roam around the roof with a tricorder or whatever to determine the optimal antenna location. But I did note that in the direction we wanted to point the antenna, there was no nearby trees or houses blocking the view. And we'd be giving the antenna about as much height as we possibly dared, to help matters that way.
Chimney and mast considerations
This chimney isn't connected to any fireplace, but decades earlier had been connected to an oil burning furnace in the basement, and possibly served as a flue for a kitchen stove. As it serves neither of these functions today, and isn't expected to ever again, there's no exhaust from it to complicate antenna matters.
(If your chimney does still spew smoke of some sort, you're supposed to add mast distance between the chimney top and your lowest antenna to reduce the corrosive effects the exhaust might have on your equipment)
Using the chimney would give us the maximum height available without punching attachment holes in the roof, or using a gigantic 30 foot or taller mast based on the ground, requiring guy wires (I'm not sure our small lot would be large enough to accommodate the wires a tall mast would require). I also hoped it'd make the mount install easier, being that the chimney had walkable roof around two sides of it at the spot I figured to install it.
We used a 20 foot telescoping Channel Master mast, but not at full extension: just around 15 foot total height, I believe (I'm estimating here, because I neglected to measure it before mounting).
Our chimney was about 6.5 feet tall from where it intersected the topmost roof. So this puts the portion of the mast extending beyond the chimney's top at around eight foot.
It's recommended that you don't let masts extend over ten feet beyond your chimney top without the support of guy wires.
Another requirement is that your chimney be strong enough to support a mast. If it's unstable, you should avoid it.
Our own chimney may be a little uncertain in this area, as it's nearly a hundred years old. Plus, got its top knocked off by a tree trunk whipped around by a tornado landing nearly atop us a year or so ago. But we decided to try it anyway (for it seems sturdy enough).
(In the accompanying pics you might notice a peculiar bow to the chimney. That bow wasn't caused by the tornado, but rather seems to stem from the original construction work, nearly a century earlier. At any rate, the bow's been there for all the decades my family's owned the structure)
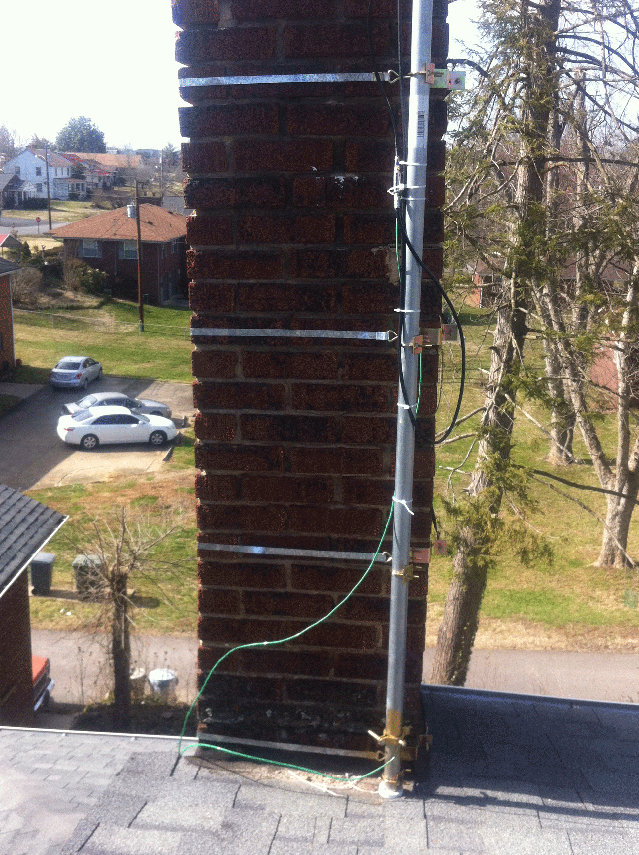
We used Z-type Channel Master chimney mounting straps. One set contains two straps. We got two sets to obtain four straps, for hopefully a stronger mounting, with less stress on any one part of the chimney, than the case would be with fewer straps.
Grounding the mast and coax cable
We obtained an eight foot ground rod and three grounding clamps from local sources, and ordered 100 feet of solid copper # 10 gauge ground wire online, after measuring the distances needed to run two separate wires: one to ground the mast, and one to ground the TV cable before it entered the house.
(Be careful not to accidentally buy stranded wire: you must use solid wire for ground wires of this sort)
Note that any ground wire connecting the ground rod to your mast or coax must be of a single piece, with no splices. And at minimum #10 or # 8 gauge in size (the smaller the number, the thicker the wire).
I ran two wires from the chimney to the edge of the roof immediately below, then through a hole drilled in the eave, to allow a more gentle curvature to the wires. We left sufficient slack at ground level and at chimney level to attach the wires to ground rod and mast and coax ground block respectively. I temporarily secured the wires near the roof base of the chimney to await the raising of the mast later.
Beneath the eave we stapled the ground wires to a vertical porch post in the vicinity, to run them down to the ground rod.
(We planned to use roofing tar around the hole in the eave, and plastic ties or staples in some spots to secure the wire to various roofing beams; we may also use bits of roof tar to fasten the wires across the short span of roof they run over, rather than using fasteners which might puncture the shingles and compromise the water proofing)
We cut the ground rod and used four and half feet, sinking most of it into the ground in a location which seems to get plenty of rain water during storms. We left enough exposed above ground to attach a couple ground clamps to.
We used a file to lightly scratch off any coating on the antenna mast where the ground clamp would be attached, in order to get a good connection, then installed the clamp and the exposed end of one ground wire (the wire we obtained had an insulating coat on it, but ground wires can be either coated or bare). Then we sprayed insulating spray over the spot on the mast (since we'd scraped off the anti-corrosion coating there).
(Since my family is a bunch of do-it-yourselfers from way back, we tend to have an inventory of incidentals like this insulation spray on hand from previous projects, which can help cut total costs (at least whenever we can remember we possess such stuff, and where we put it (and it hasn't gone bad with age))
The grounding block for the TV cable we ordered online. Basically it's the bracket where the coax from inside your house will connect to the coax coming down from your antenna. It also has a place to attach the end of a ground wire to. So one of our ground wires runs from this block down to the ground rod, and the other from the mast clamp down to the ground rod.
(I encountered conflicting info online about the grounding block, which took me a while to properly parse; I ended up replacing this component with a lightning arrestor later, as detailed elsewhere)
So why didn't we just run the ground wires from the mast and coax connections to the house's main ground rod attached to the main power box? Well, multiple online sources recommended a separate rod for the antenna. Plus, there were warnings that our ground wires needed to be as short as possible, with no sharp bends or kinks, and be kept a certain minimal distance away from our main power lines. All those restrictions also helped the case for having a separate rod for the antenna, due to our real world conditions.
A couple things we learned or figured out late in the game here was that it was a good idea to run a wire from the new antenna ground rod to the house's main ground rod too, along the foot of the house. For sources indicate this helps make sure the whole grounding system works most efficiently at funneling any lightning strike directly towards the nearest ground rod.
As our second ground rod isn't far from the first, we measured a need for around 33 feet of wire to connect them. This also meant acquiring a couple more ground clamps, and using some fasteners to attach this new wire to the house, where it ran around it.
We actually ended up using bare number 6 gauge solid copper wire for this wire between the rods, because we ran across a decent deal on it locally.
(I didn't run across any literature recommending a specific size for this wire running between two or more ground rods, until a couple days after installing our own. I was surprised then to see that number 6 gauge was actually the recommendation for it. Up until that point I'd thought we'd actually installed something maybe lots heavier than necessary for that item)
Lightning arrestors
Another item was the lightning arrestor. Initially I had problems figuring out exactly what this was online, and whether it was a necessary element or not. For the literature from different sources seemed inconsistent on the point. However, now I think I understand. Basically you should use this in place of the coax ground block to tie together your house coax and antenna coax, attaching one end of a ground wire to it in a manner similar to the ground block (so the first coax grounding block I bought (which didn't include a lightning arrestor) was probably redundant).
It seems that certain building codes call for the use of a lightning arrestor on antennas rather than an arrestor-less grounding block; but lots of business entities may cut costs by substituting a plain ground block instead, wherever they can get away with it. It seems your home and property will be safer with the arrestor, rather than without it.
Whether you use a plain grounding block, or a lightning arrestor, both of them would be located at the same spot in your set up: at the point just before your coax enters the interior of your home. For us, that was just before the coax plunges down the chimney. So the block or arrestor was mounted on the mast a few feet below the lowest antenna, within easy reach of anyone standing on the roof there, for convenient connection or disconnection of the antenna assembly from the house's internal coax network.
A good lightning arrestor seems to include both an attachment for a ground wire, and a small canister filled with gas, which is designed to shunt a lightning strike away from your coax and towards the ground rod, virtually instantaneously. It also seems to reduce any build up of static electricity on your antenna, making it less likely to attract a strike in the first place.
(Note that this was one of the things I encountered some inconsistencies about online, with at least one very credible looking research paper seeming to indicate that there existed some antennas out there which, due to their design, might actually suffer more static electricity build up from an attached arrestor, rather than less (and so be more attractive to lightning, rather than less). Yikes! The paper told of a way to determine which type of antenna you had, with use of an electrical meter. But as I didn't run across this paper until after the antenna was already up, I'd have to take the antenna down again to do such testing. However, as arrestors are required in the official codes, and the web site of the maker of the antennas I used points to documents referring to those codes, I decided I'm probably in the clear on this point)
I also ran across a different sort of arrestor which doesn't incorporate a place to attach a ground wire. Yikes! Instead of redirecting a lightning strike to ground, this arrestor would simply burn out and permanently break the connection, hopefully preventing the charge from proceeding on into your home and frying everything in its path. From what I could learn online, this type seems to be disposable surge protectors of a sort, and so are cheaper than the other kind. However, I also read that if you use these, you might should use several of them in a row together (or in series) to increase their protective value.
Me, I decided to utilize an arrestor with a ground wire attachment.
Another element I arrived at late in the process was a wire connecting the new ground rod we installed for the antenna, to the house's old ground rod, some 33 feet away, as I mentioned earlier. This wire we ran along the wall there, a couple feet above the ground, allowing it to gently curve around corners and entrances to span between the rods.
The purpose for this connecting wire is to balance out the ease with which any lightning bolt can reach ground through either. Such a balance is supposed to help minimize the risk that a bolt will wander around through the house wiring for a split second (damaging everything electrical it touches) rather than getting itself to ground immediately via the routes provided.
Coax cable
I ordered 500 feet of RG6 Quad Shield coax cable online. In this item I afterwards learned it might have been better to just get dual shield instead, as the quad shield won't offer any advantages in most situations, and may often entail considerably more hassle installing connections (as the cable may be too thick to put many kinds of RG6 connectors onto). It might even cause a bit more signal loss per foot than dual shield, too (yikes!). But I was in a bit of a hurry, and misread something on the matter, and hence, that's what I ordered. I mean, it works fine and all, but I'd likely go with dual shield if I had to do it over again, to maybe get by a little cheaper, and get a bit more signal strength, plus have fewer problems installing connectors.
We only figured on needing 200 feet of cable at most. But the sizes available which included that length were 250 and 500-- and for some odd reason the price was the same for both lengths. So I got the 500.
Running coax down inside the chimney
To get coax cable down the chimney, we tied a small weight to the end of a long rope, and I lowered it from the top of the structure. We figured we'd tie a coax cable end to the rope in the basement, and I'd pull it up to the antenna's position.
There turned out to be unexpected complexities about the chimney's internal structure and conditions, with perhaps two entirely separate vertical chambers, and different access ways to them in the basement's end of the chimney.
In the basement there turned out to be three different entrances/exits for chimney access. One was through an ash removal trap door in the foot of the chimney. Another was via a chamber which ducted into an old oil burning furnace (not used in decades now). And the third was a closed off flue access port, where perhaps a stove or other appliance might have been installed in the basement at one time. The flue port had been closed up and slathered over with a thin layer of concrete many years before.
We first tried finding the weight/end of the rope through the trap door near the floor. Only to discover a few feet of ash possibly blocking it from view. We emptied the ash, but found no sign of the rope, even using a small mirror and flashlight to look upwards through the shaft.
We next examined the ducted access to the furnace, and decided it'd be a major project all its own to try to get to the rope that way.
That left the flue port. We attacked the thin concrete and busted through. And there was the pile of coiled up rope, just behind it (I'd lowered far more rope than necessary, as it was difficult to tell when I'd struck bottom).
We installed a connector onto the cable coming off our spool, tied it to the rope, and on the roof I pulled it up, then temporarily secured it, awaiting the mast.
The antenna and mast assembly
I chose Antennas Direct Clearstream 4 and 5 for antennas. Both of them are rated for distances greater than the roughly 45 miles we faced. I hoped their extra capacity would help make up for the nearby hill blocking us from the transmission towers.
One of these is a UHF and one a VHF antenna (the VHF antenna package says it'll also pick up UHF as well, but by that it means strong UHF signals, from relatively close broadcasting stations; its specialty is actually long range VHF). I used separate antennas rather than a combo for a couple reasons. One, I hoped the specialized designs would do better in reception than a single combo antenna suffering from design compromises. Two, it seems that using separate antennas allows you to get by with two devices considerably smaller and more compact than a single combo design might be. This smaller and more compact size makes for easier and less awkward manhandling of the combined mast and antennas for installation and maintenance, plus hopefully reduces by a bit the risk posed by wind forces, due to smaller surface area, and less metalwork/mass extended out to farther distances from the mast itself.
The downside of this is a bit of added complexity in antenna/mast assembly (since you must combine the two signals with another mast-mounted device), plus the need to keep at least three feet of distance separating the two antennas on the mast, for optimal performance (we went over this minimum by a bit for good measure).
A UHF and VHF signal combining device came bundled with one of the antennas, but we replaced it in our set up with a preamplifier which also did such combination: an Antennacraft 10G222.
The 10G222 consisted of two major components, one meant to be mounted on the antenna mast between our two antennas, and one far away, down in the basement, where the antenna coax first enters our internal TV cable network.
The mast-mounted component is the actual amplifier, and accepts the input from both antennas, combining them into one signal, which it then passes on to the coax to run into the house.
The basement installed component receives the signal from the preamp and passes it on to the network. But it also plugs into the house's electrical power system, and sends power backwards up the coax to the mast-mounted box, to enable the amplification.
I also ordered a tool kit for installing compression �F� type connectors on TV coaxial cable (a DataShark Satellite & Digital Cable Tool Bundle #70018 by Paladin Tools).
Silicone grease and plastic tie wraps were bought locally (you might have to get the grease from an auto parts place). What we ended up using has �AGS DIELECTRIC SILICONE COMPOUND FOR ELECTRONIC SYSTEMS� on the tube.
The silicone grease we applied to the exterior of the cable connections on and around the antenna mast, which would be exposed to the elements. The plastic ties we used to attach the cables securely to the mast to keep them from flapping in the wind, or getting in the way when the mast had to be man-handled onto the roof and attached to the chimney mounts. They also helped about arranging the coax cables in such a way as to create loops where water could run down and drip off, rather than moving so much over connectors, and/or hanging around them.
(The grease is similar to Vaseline, only much slicker, and probably lots more robust in weather resistance. If/when you must revisit connections you applied this too, you'll want to clean it completely off the connections first if possible, just so you can get a grip on the equipment. Then reapply a new coat of grease when you're done)
Some weather booted cables accompanied the preamp, and we used them with it. But we didn't have enough boots for all the connections on the mast. Note that either you'd have to buy pre-made cable lengths with such boots already on them, or else buy boots separately and put them on cables yourself prior to installing connectors on them.
At this point I should mention we also obtained an assortment of short factory made coax cables at very low cost from a local Good Will store. These were handy for filling in cabling gaps in the combined antenna/mast assembly, and covering short spans elsewhere like between surge protectors and TVs and other gadgets.
We cut off the end of an appropriately sized PVC pipe cap to sit under the bottom end of the mast on the roof, so as not to cut into the shingles. Though the mast fit pretty snugly into the cap, we also drilled a hole in the cap's bottom so it could drain any water which might collect there-- and positioned the hole at the lowest point in the roof's tilt there.
We also found a plastic cap suitably sized to cover the hole at the top of the mast, and used vinyl electrical tape to securely attach it there (an attempt to glue it in place with caulk didn't work).
Keep in mind that once your mast is up and installed, you'll probably be unable to access again any of those antennas or signal combiners or pre-amplifier modules and most related connections, without first detaching the mast and bringing it back down again. So you'll want to make sure you've attended to every necessary detail on that assembly before actually raising it into place.
To assemble the entire contraption at ground level, we'd laid the mast down on a rear deck of the house, its top end atop a deck hand railing, and its foot resting on a wooden box on the deck itself, both ends held in place with a couple bricks to either side. Then we'd bolted on the antennas and preamp, and coax ground block and mast grounding clamp. After that we'd strung short coax cables between the various components as necessary, positioned weather boots where available, and applied silicone grease to all the coax fittings.
Installing the antenna chimney strap mount kits
Installing the chimney mount straps was by far the toughest part of the job for me. I had good access to two sides of the chimney (though both those were at the very edge of the roof). The top of the chimney was about a foot and a half above my head when I stood behind it.
Installing these straps under these circumstances is probably best done with two men, with one of them on a ladder on the other side of the chimney. Note that the ladder would have to be standing on a slanting roof in our case (not a position I'd eagerly volunteer for). So some rope for tying the ladder in place might be advised, if you go that route.
SIDE NOTE: This was a family project, with my dad doing plenty of work on the ground and in the basement (for example, he built the wooden frame I used at one point to get a very stubborn chimney mounting strap in place). And my nephew-in-law helped for about fifteen minutes in getting the antenna assembly up onto the roof, and into place next to the chimney, where I could bolt it to the chimney brackets. My dad also stayed close by whenever I was atop the house in case something unexpected happened, and he had to call 911 (ha, ha). But I did all the massive online research involved, plus everything required on the roof prior to the antenna actually getting erected (my dad's in his eighties, and so shouldn't be up there anyway), and many of the ground chores as well. Dad also helped me a lot on brainstorming up ways to improvise solutions to problems encountered. END NOTE.

I didn't want to climb a ladder in that spot. And I also had to install the straps alone. So it was pretty difficult. I had to figure out workarounds for those situations where I needed three hands and only had two.
But prior to that stage, you have to assemble the straps themselves. For basically you get some brackets and buckle bolts and nuts in a kit, and a couple rolls of stainless steel strapping. You have to measure your chimney and then cut the strap to fit, then you have to firmly attach a buckle bolt to each end of the strap. These bolts will be attached to the bracket, securing it to the chimney.
You'll need some tin snips for cutting the strap, and some pliers for bending and crimping the clamps (plus decent hand strength). Determining the proper length for the straps is a trial and error process, as it's far more complex than simply measuring the sides of the chimney itself. For you need slack for various purposes. And yet if you have too much slack, you won't be able to tighten the straps properly. Too little slack, and it becomes a struggle to get both ends attached to the bracket (if you can ever get the strap around the chimney in the first place).
Of course, you can't afford very much error at all here, for the metal clamps meant to fasten a buckle bolt to a strap will take only so many repetitions of closing/crimping, opening, and then closing/crimping again, before they become too metal fatigued to be reliable. And you could run short on the stainless steel strap too, if you end up wasting too much.
As of 2013 it's becoming ever more likely that your local hardware stores will not stock specialty items like stainless steel strapping and the particular type of clamps and bolts used for this chimney mounting kit (much of this stuff seemed to be weather treated in some way, with a bright golden finish). So you might have to order replacements online, adding to your installation costs, and delaying the installation itself.
But getting back to determining the strap lengths, to make for a still stickier situation, the range between having too little slack and too much in the straps may only be a couple of inches. So there's not a whole lot of room for error in the task.
The strap kit doesn't instruct you in how to estimate such measurements, or even how to properly crimp the metal clamps onto the strap ends. And just making your best guess about crimping technique might not result in a sufficiently strong connection. For instance, I had one strap pull out of its clamp when I tightened it a bit too much, and had to start all over with it again (redoing the crimping of the end clamps).
Of course, I may have been over-estimating how tightly the straps needed to be wound, since the way the brackets are shaped seems to hold them well in position once installed. But I don't like to underestimate the force of the wind up there.
In my research I read where other installers besides myself had overtightened the straps and faced problems over it (but none of them elaborated further on their misadventures).
Basically it appears you do not have to tighten the straps to their maximum tautness. And perhaps cannot, without ruining the clamped ends (with the straps pulling out of the clamps), no matter how diligent you try to be about securely fastening the clamps themselves.
But luckily the brackets seem to become securely attached to the chimney quite some time before you'd approach maximum tightness on the straps. You can test this yourself by trying to nudge the bracket out of position at various degrees of strap tightness, and also by plucking at the straps themselves.
But of course, all those niceties are things to be checked after getting the straps onto the chimney in the first place: a task quite difficult to do for only one man, on a large chimney, in a frequently precarious elevated environment.
This particular chimney was far too big for me to be able to simply reach one strap end around to myself on the other side. And note it was taller than me too, so tough to throw the strap hoop over, as well.
Another added complexity was the strap's tendency to spiral up once unrolled, to become like a giant, very loosely coiled slinky. That makes it even tougher to get it around a chimney, and even if you succeed at that, the slinky effect could cause all sorts of unwanted twists and kinks in the strap, perhaps ruining it, or at least forcing you to began again about trying to get it properly encircling the chimney.
So you'll want to massage the steel strap as you unroll it, to try to make it stay straight and flat for all the subsequent handling. I advise using gloves for this, as the strap may otherwise cut your hands and fingers (this entire antenna installation project was a pretty bloody exercise for both dad and I, between metal edges cutting us, bricks scraping our knuckles, and accidental finger mashing).
But even after straightening, our straps were sufficiently long and narrow of width to be very floppy, which also added to the difficulty of one man getting them around a chimney.
So I used a long fiberglass pole with a hook on the end (16 to 18 feet long I think; this thing's been used here for stuff like retrieving bird feeders from tree branches, or pulling wind-broken branches out of trees, for decades). I'd hold the bracket attached end of the strap in my left hand, and maneuver the rest of the strap over and around the chimney with the pole, which had its hook inside the loop of the buckle bolt in the strap's other end.
I had to extend the pole far out over the edge of the roof, as I practically hugged the chimney from my position. Once I blindly had the strap loop over and around the structure (my face at that point pressed up against the bricks), I pulled in the long fiberglass pole holding the other strap end in its hook. Once I got that end close enough to the bracket placed against one corner of the chimney, I'd reach another one of those instances where I needed three hands again. Namely, I'd need one hand to hold the corner bracket in place, another to hold the second strap end in place, and a third to twist on the fastening nut, once I got the second buckle bolt into the bracket slot (I began the entire process with one strap end's buckle bolt already fastened to the bracket).
This part could be excruciatingly difficult and frustrating, depending upon the slack or lack thereof in the strap. That slack would depend upon not only your correct estimate of the measurement beforehand, but also the current position of the strap around the chimney. If the strap was cock-eyed or uneven in any way upon the chimney, that would consume vital slack you needed during the attachment process (and being cock-eyed was the usual condition of the strap at this stage of the game).
And recall that meager two inch window of error on strap length I spoke of before. That small measure meant that-- if you got the length right-- then it took very little in the way of uneven positioning around the chimney to make attachment downright impossible, due to the second bolt never entering the bracket slot to get fastened with a nut. Ouch!
And you can't do much at all to adjust the strap's position once you're already trapped in the three-handed situation of trying to affix the loop with a second fastener on the bracket.
See how badly you'll want a second person on the roof with you?
So you must try to get the strap as perfectly positioned as you can prior to getting it attached around the chimney. Then attach it. Then tweak it as necessary to get it properly oriented into its final position.
I found that during the three hand phase using a short elastic bungee cord came in handy. That is, I could get one bungee hook into the bracket end of the strap, and the other into the second buckle bolt, and then pull on the middle of the bungee cord to tug on both strap ends at once, with a single hand. That way, once I got the second buckle bolt end through the bracket slot, I could hold it all in place with one hand, freeing up my other to screw on the final nut. Ta-da!
Of course, after you've got it attached, you then have to get the strap into its final position, which might be as much as several bricks or inches away from its initial placement (since you almost certainly won't get it there in your initial damn-it-all-just-get-it-attached-already stage).
For this part you do NOT want the bracket nuts to be tightened, but instead as loose as possible-- but not so loose that the entire strap might come apart, and cause you to have to reattach it around the chimney again (ow!), or worse still, drop and lose one of those precious weather treated nuts, for which there'll be no quick or easy replacement (double ow!). Because you'll want all the slack you can get in this stage. And recall that you had to remove a lot of slack long before this point.
So now you'll be stuck trying to tug the chimney encircling strap either up or down here and there, especially at the corners, where the strap will tend to get caught in the gaps between brick rows.
Your goal will include these elements:
Each strap being centered on a particular single horizontal brick row, and NOT caught in the mortar between two rows.
Your top strap being just below your chimney's cap.
All your straps being equally spaced from one another vertically on the chimney.
Since you don't have much slack anywhere in the system due to the need to be able to tighten the buckle bolts at the end of the process-- and your earlier strap massaging to straighten and flatten the strap actually consumed some slack itself, and the metal straps tend to lock onto the corners of the chimney, resisting any further efforts at movement either horizontal or vertical-- it can be very tough to do fine tuning of your strap placement. Add to all that the possibility that you're severely limited in directly touching 50% or more of the strap length for such adjustments without taking extraordinarily risky maneuvers, such as I was, and the task can sometimes seem almost impossible.
When a strap gets caught in the gap between bricks on a corner, it can be very difficult to get it back out again. Even when you can get to it easily, and use things like fingers, flat screwdrivers, and needle nose pliers on it. Alternatively, when your only access to it consists of something like a small rake held at arm's length in your non-dominant left hand, as you lean over the edge of a second story roof, while holding onto the opposite side of the chimney with your right hand-- or otherwise reaching up to it with a nail hammered into a wooden stick, several feet over your head, as you stand on the slanted first story roof-- it can quite often seem to shift into the definitely impossible category. But you just have to keep trying until you succeed.
The last strap (the highest positioned on the chimney) proved to be the most difficult of all at getting it where we needed it. After several futile efforts, I finally decided something more would be required in its case.
So we threw together a light weight, three-sided wooden frame, with a wide collar of horizontally projecting cardboard flaps sticking out atop it on two sides, meant to fit snugly around the chimney and hold itself in place vertically with no fasteners whatsoever. The idea was for me to slide the frame onto the chimney from my usual position before it, at the height I wanted the strap to go, and the frame would hold itself there while I hoisted the strap up and over the chimney. Then, as the strap dropped, it'd get caught on those two sides by the cardboard flaps, and voila! It'd be exactly where I wanted it, and all that would be left to do would be to attach it.
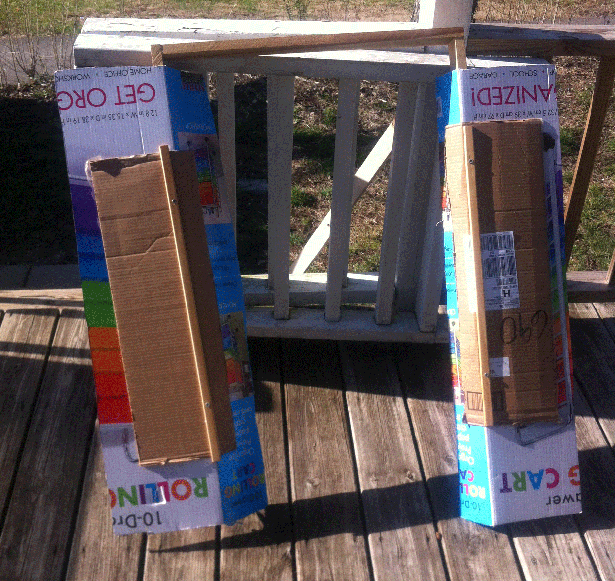
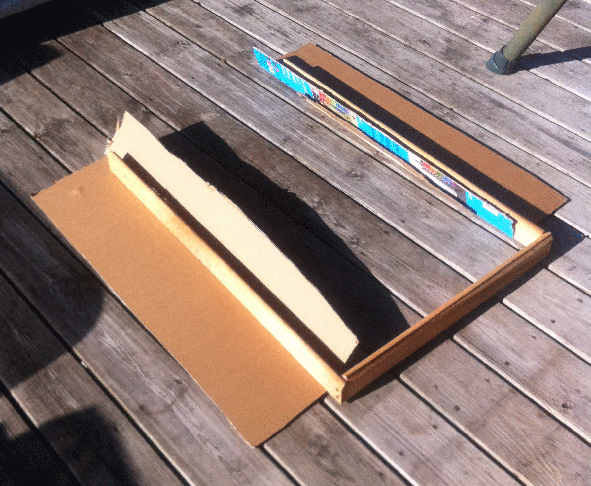
Note that of the two pics above, the top photo shows the top side of the frame as I used it, while the bottom image shows the bottom side of the frame. This particular top/bottom orientation was the best for getting the strap to fall into the spot I wanted without getting hung up on an extraneous protruding edge of the device.
Although it didn't work perfectly, it did work pretty well, getting the strap pretty darn near its ideal location, where I then fastened it, and adjusted it until it was just right, position-wise.
We did have to add a little padding to the frame early on to get the close fit we required.
In fact, the frame worked so well, it's a shame I didn't think of it sooner. For it would surely have saved me a lot of trouble on the other straps as well.
Brainstorming up little tricks like I did can help tremendously. But if at all possible, get yourself a human assistant who can also work with you atop the roof, so that you can reduce the risks, do everything faster and easier, and cut the need for creative brainstorming of solutions.
Once I had all the brackets and straps in place, and we'd fully assembled the mast and antennas configuration on the ground, we waited to pounce on a visiting nephew-in-law to get me a second man to help with taking the antenna assembly up onto the roof, and holding it in place while I attached it to the brackets.
While it's possible that I might have been able to get the antenna assembly onto the roof and attached to the chimney alone, it would at the least have been quite strenuous at moments, and probably unsafe-- for both me and the antenna. So I would likely have delayed taking the antenna onto the roof indefinitely, until a second person could be found to help.
The antenna erection stage turned out to be pretty easy and quick. Better than expected.
The results
What TV reception results did we get? The main three stations we wanted (NBC, ABC, and CBS affiliates) had their broadcast towers all in almost a perfectly straight line from us, the nearest around 45 miles away. I used the compass app on my iPhone to point the antennas the 280 degrees from magnetic north that tvfool.com indicated.
Those three channels were the must-haves, if we could get them. I personally also hoped to pick up Fox and CW too. And it turned out they were in that same direction, or very close to it. And the antennas seemed to get watchable signals from as much as a 30 degree angle centered on where they were aimed. So we did get the 'big three', plus Fox and CW-- and another 15 besides (in our maximum channel haul, with the antenna connected to only one TV; the more TVs, splitters, butt connectors, and longer coax lengths involved though, the fewer channels you'll end up with overall).
That unexpected and extra 15 channels turned out to include one religious channel, PBS, and a couple of children's channels (including QUBO). As well as ION (old films and TV shows), ION Life, THIS (old movies), SHOP TV and CREATE (DIY and cooking shows), and a couple of secondary channels related to the target channels we were after in the first place (a couple of the big network affiliate stations had apparently launched some subsidiary channels off their antennas too).
One oddball channel source of the 15 turned out not to be in that forward facing 30 degree arc at all, but instead almost directly behind the antennas, in the opposite direction. However, it comes and goes due to weak signal strength, so I'm unsure how watchable it might be. Two or three others of these extra channels may also be somewhat spotty in this fashion. So it appears we've got 16 reliable channels at most, with no rotation ever required of the antenna. Ignore the religious and children's channels, and you get 13.
According to the one digital TV we had it connected to initially, signal strength (even with the preamp, and maybe 25 foot or higher antennas, with the signal traveling through maybe 70 feet of cable, and a second coax amplifier in the system) varies and fluctuates between around 30% and 70%, depending upon which channel you're checking, and when.
(Many modern flat screen TVs may have hidden in their onscreen menus somewhere a signal gauge function for this, though it may be difficult to find and use it. The Sanyo we found such a gauge on seemed to give different readings per whatever channel it was tuned to at the moment)
Picture quality seems to be very good, for those channels actually showing HD content (TV shows and films older than five years or so tend not to be in HD).
Divvying up the signal among a total of four TVs
Much of the above concerned reception on the first TV we hooked to the new signal, when it was the only one. We decided after that to connect three more.
Of course, this diluted the signal. Due to the use of splitters, and extra cable lengths involved. So I figured the more TVs we hooked up, the fewer reliable channels each would display.
One way to keep the signal degradation from this process to a minimum is to keep the total distance of all cable runs as short as possible, plus make minimal use of splitters or butt connectors. By minimal use of splitters, I mean do NOT use a four way or three way splitter where only a two way is necessary: try to use one with the exact number of connections required. Otherwise you'll need to cap those unused connections with a special part (terminating cap) to prevent added trouble for your signal.
On the other hand, if you've got plenty of signal strength, terminating those unused ports might not matter. In our case though, every little bit of signal was important.
So we split the signal two ways, and immediately ran into some picture trouble on both TVs, with the signal apparently being weakened too much by the change. So we tried something else: running the antenna cable first into a second amplifier-- this one a holdover from our cable subscription days, which had boosted the signal for the huge DIY coax cable network we'd had in the house for decades, feeding almost every room in the structure, some rooms with several different connections to choose from. This old amplifier has �VIDEO single output VHF/FM/UHF 12 dB amplifier 50-900 MHz� on its label. I could see no brand identification without taking it loose from its mounting to see the back side.
I'd read that you needed to use 'matched' amplifiers in any system already using an antenna pre-amp, and wondered how well all this would work. But it all seemed to function, with the extra amp seeming to remedy most of the display problems we initially saw with adding the second TV.
In fact, the second TV seemed to pick up an additional channel or two over what we'd seen on the first set (automatic channel searches/programming had to be repeated for both TVs after the changes). However, the extra couple channels weren't reliable. Basically, one of them was a second PBS channel from a different direction compared to the initial PBS find, and so redundant for us anyway. And the other wasn't anything to write home about either, and so wouldn't have represented any real gain even if it had been stronger.
The first TV we connected to was a Sanyo brand, the second an LG. I don't know if the difference in the number of channels they found represented better quality tuners in one than the other, or the simple fact that one was perhaps oriented in a way as to help a signal coming from behind the set itself somehow boost what the TV got from the antenna (for the new channels seemed to come from that direction).
The addition of the second amplifier didn't solve all the problems caused by the new splitter, but it seemed to solve the most pressing ones, and helped to restore the quality of the major channels we were after-- only now we had them on two different TVs.
Soon after that we'd added two more TVs, for a grand total of four on the antenna feed. We didn't add any more amplifiers. The TV with the longest cable feed from the antenna, and most splitters in-between, gets the fewest clear channels: but still it's receiving all the target channels, plus a few more besides.
Since the antennas went live, we've experienced two windstorms/bouts of bad weather. The first was accompanied by weather authority warnings of gusts up to 80 mph (but I don't think it ever got that high). The second and more recent didn't have such dire warnings, but I believe hit us with higher sustained winds for a longer period than the first instance (like maybe up to 45 mph or so).
Out of curiosity I tried watching OTA (over the air) TV during the second case, and witnessed even our primary channels cutting in and out pretty badly, with the secondaries often going out completely. But once the wind died down again, the channels seemed as clear as before. For further details on the second weather event, considerable rain was involved early on; then temperatures dropped, and we got snowfall.
Surge protection
I already described using a grounding block/lightning arrestor for the coax feed off the antenna, and a ground clamp on the mast, with both clamp and arrestor having ground wires running down to a ground rod beside the house, and that ground rod itself being tied to the house's original ground rod some 33 feet away with a length of copper wire.
But there's more you should do here to protect your expensive flat screen TVs. After all, that antenna is a bonafide lightning rod. And the coax feed connects it to all your TVs.
At the very least, you should make sure to run that coax through a good desktop surge protector, before it connects to your TV (and yes, there are available such types of surge protectors, with coax connections).
So we put one of these next to every TV to be connected to the antenna.
However, we also took another couple steps beyond that, for protection. Namely, in the basement, we ran the antenna coax through the same sort of desktop type surge protector described above before letting it connect to any of the lines running to TV sets at all. So after the lightning arrestor on the roof, this basement residing surge protector is the next guard in line. And only after making it through that one, would any spike strike the surge protectors connected to a particular TV.
But we went still further than that even, by using slip-on/slip-off connector coax cables in the last link between each TV and its own accompanying surge protector, so that we can easily and quickly disconnect any TV from the antenna at a moment's notice in stormy weather (we've already for decades now routinely unplugged the AC power cords of expensive appliances like flat screen TVs and computers from their surge protectors during lightning storms; so doing the same with these slip on and off coax connectors should be quite doable as well).
Fortunately both flat screens and PCs have been getting cheaper over the years, so it's becoming less of a financial hit if one gets fried. For instance, after seeing the antenna was working, my folks found deals on new 32 inch flat screens under $200 each (and that's where the third and fourth TVs connected to the antenna came from). So maybe pretty soon we can all begin to relax a bit more about surge protection.
Hindsight into the project
Looking back on it, I was nearly overwhelmed by the complexity to be found in fringe area TV reception technologies these days. And somewhat disappointed by the online references I found for how to go about all this. Sure, some of them were excellent: but those same sources also tended to be woefully incomplete, information-wise. Forcing me to refer to far less stellar sources to fill in the blanks. And that's where I ran into wildly inconsistent recommendations on various matters, and perhaps even outright misinformation (thereby burdening my poor overtaxed noggin with the responsibility of figuring out what was likely true, and what wasn't).
One valuable source of info was lots of buyer reviews of various products on Amazon. While there could be wild fluctuations in opinions there (sometimes stemming from wide-ranging differences in personal experience, knowledge, and skills relevant to the project at hand), whenever there were lots of reviews (like 30 or more), if you read most or all of them, you usually picked up useful information on your potential purchase.
But other sources (even the more iffy ones) could also be helpful-- so long as you could find plenty of them to weigh one against another, when they differed in their opinions or information.
Unfortunately, it's tough to have sufficient extra time available to do all that searching and reading. Especially for a project like this, which involves so many variables and possible contingencies.
And it also hurts the project when some necessary items seem to have a limited market, and few suppliers. Everywhere that that's true, you tend to find it more difficult to get complete sets of product specifications while shopping, or a critical mass of honest buyer reviews (and it tends to make such items lots more expensive, as well). And with the prevalence of cable TV and internet video in America, along with the fact that most TV viewers living within 30 miles or so of major metro areas can probably get plenty of OTA TV with a cheap desktop antenna from a discount store, certain aspects of outdoor antenna selection and installation for rural dwellers tend to be fraught with financial risk and uncertainty (not the least of which being that few retailers will suffer the return of an antenna once it's been installed, according to many sources).
So it's clear why many rural residents don't even attempt a project like this one. For it can be costly. And sometimes simply not work after you've invested considerable time, money, and effort into it.
I hope this page will help a little with all that.
Costs
We paid nothing for related labor, with me personally doing all the work on the roof alone, but for raising the mast. As I was under a bit of time pressure on the project (and learning as I went), I placed separate orders for the required items over a period of days, sometimes bundling two or more things in an order, sometimes getting only a single item.
A list of related purchases and total costs can be seen below. Shipping costs, if any, are included (I purposely avoided choosing the option of anything faster than the slowest shipping methods, which often allowed me to pay nothing for shipping at all from vendors like Amazon (and even the slowest methods usually take no more than three or four business days to deliver)); sales tax may or may not be included below, though. NOTE PRICES GIVEN BELOW WERE WHAT WE PAID, QUITE SOME TIME AGO; SO THE LATEST PRICES ON AMAZON WILL USUALLY BE HIGHER NOW DUE TO INFLATION:
One Antennacraft 10G222 High Gain VHF/UHF TV Antenna Pre-Amplifier
$42.82
Antennas Direct C5 ClearStream 5 High Gain Digital VHF Antenna
$89.99
One Antennas Direct ClearStream4 HDTV Antenna and one Southwire 56918445 500-Feet Quad Shields Type RG 6/U 18 AWG Coaxial Cable, Black
$124.93
One Channel Master CM 1820 20' Telescoping Steel Antenna Mast (CM1820)
$77.87
Two sets of Channel Master CM-3080 Antenna Chimney Mount, 1 Pair and one F-pin Coaxial Grounding Block,1 GHz, Single F-pin Female
$29.44
One WRGND100 Copper Ground Wire #10 Gauge - 100 Ft
$34.34
Two RCA 8 Outlet, Coax-Phone, 3120 Joules Surge Suppressor PS28210B and one TII 212 Broadband Cable TV Lightning Surge Protector
$67.97
Some items mentioned in this article (especially some of the tools, insulating spray, and old coax amplifier) were items already on hand on the premises, and so not necessary to buy.
Various items purchased for this project but missing from the list above include the 33 foot long ground wire running between the two ground rods, the silicone grease, the new ground rod, five grounding clamps, and several short factory-made coax cables bought from various local sources.
Follow up
An inspection roughly a week after erecting the antenna (during which there'd been many windy days, with one including 45 mph gusts, and another perhaps even higher) revealed a loosened top strap, which I tightened. I believe what occurred was some of the small slack-consuming undulations stemming from the hand massaging of the strap we'd done previous to install to correct its spiraling nature, had been worked out of the metal by the wind action, and repeated heating and cooling by the day/night cycle.
Reference links
Below are some more links you might find helpful:
Tigerbangs NEW Prescription for Deep-Fringe Reception
Choosing and Installing an Antenna for HDTV
An HDTV Primer is full of advanced tech info about this subject, perhaps answering any possible question you might have. Unfortunately, I'm only now realizing this, after I'm already done with my own project.
3-21-15 UPDATE: Somewhere in all the equipment installation instructions I read was the recommendation to inspect the antenna once a year after erecting it, for maintenance purposes. I think this may have been related to the gear used for attaching the mast to the chimney. I did that, and everything seemed just as it should be, so I changed or adjusted nothing.
We also had our chimney overhauled some weeks after installing the antenna, too, with professionals shortening the chimney down to where the damaged portions could be removed, and the structure evened up at its top edge, and sealed with a concrete cap. They also applied new cement over the whole chimney structure, to protect the old original and now deteriorating cement from further weathering, and stiffen it all up a little more. I was glad to get this done because the many windstorms we have here often had me imagining the wind using the antenna as a lever to yank the chimney around, eventually causing it to fall over.
How much did the chimney overhaul and capping cost? $600. However, this didn't come from the antenna budget, but rather insurance money related to the tornado which did that damage to the chimney in the first place (a tree trunk knocked the top of the chimney off).
Alas, sealing up the chimney brought us a mold problem in the basement, which used to get ventilated that way, forcing us to clean up the mold, as well as redirect a certain roof mounted rain gutter's output away from the ground near one basement wall, where the moisture will otherwise seep in and feed the mold problem. We were also forced to repair or replace several old basement window screens, so that we can now open some basement windows during the warmer months, to better ventilate the basement to keep it dryer, and minimize mold problems.
The perspective from a couple years of antenna use: 95% of the time we get excellent reception with the set up, despite having a massive hill only a few hundred yards away directly blocking our line of sight to the broadcast towers, some 40+ miles away. However, severe weather, or dead calm and fair weather, both reduce performance, apparently because both these conditions weaken the circumstances which allow the signal to bounce off the atmosphere and over that intruding hill, to reach our antenna.
On the flip side, we seem to have gained at least a couple of new channels since the install, and had one change ownership from one network to another.
All the new channels are either independent ones, or subordinates to existing major channels. In one case, our THIS TV, which we liked a lot due to it showing plenty of old wide release movies from the 1960s and 1970s, changed hands to Bounce, a channel apparently targeting a black audience. Personally, we'd preferred THIS. But sometimes we find something to watch on Bounce.
The two entirely new channels include Escape and Grit. Escape seems to offer a lot of unsolved mysteries and police chase videos, while Grit bills itself as content for men, with old war, action, and adventure films. The men here like Grit.
However, you typically only learn of the existence of such new channels when you happen to rescan for them on your TV. So in some cases you might have access to a new channel for months before you realize it by performing a new scan.
END UPDATE.
Copyright © 2013-2015 by J.R. Mooneyham. All rights reserved.